

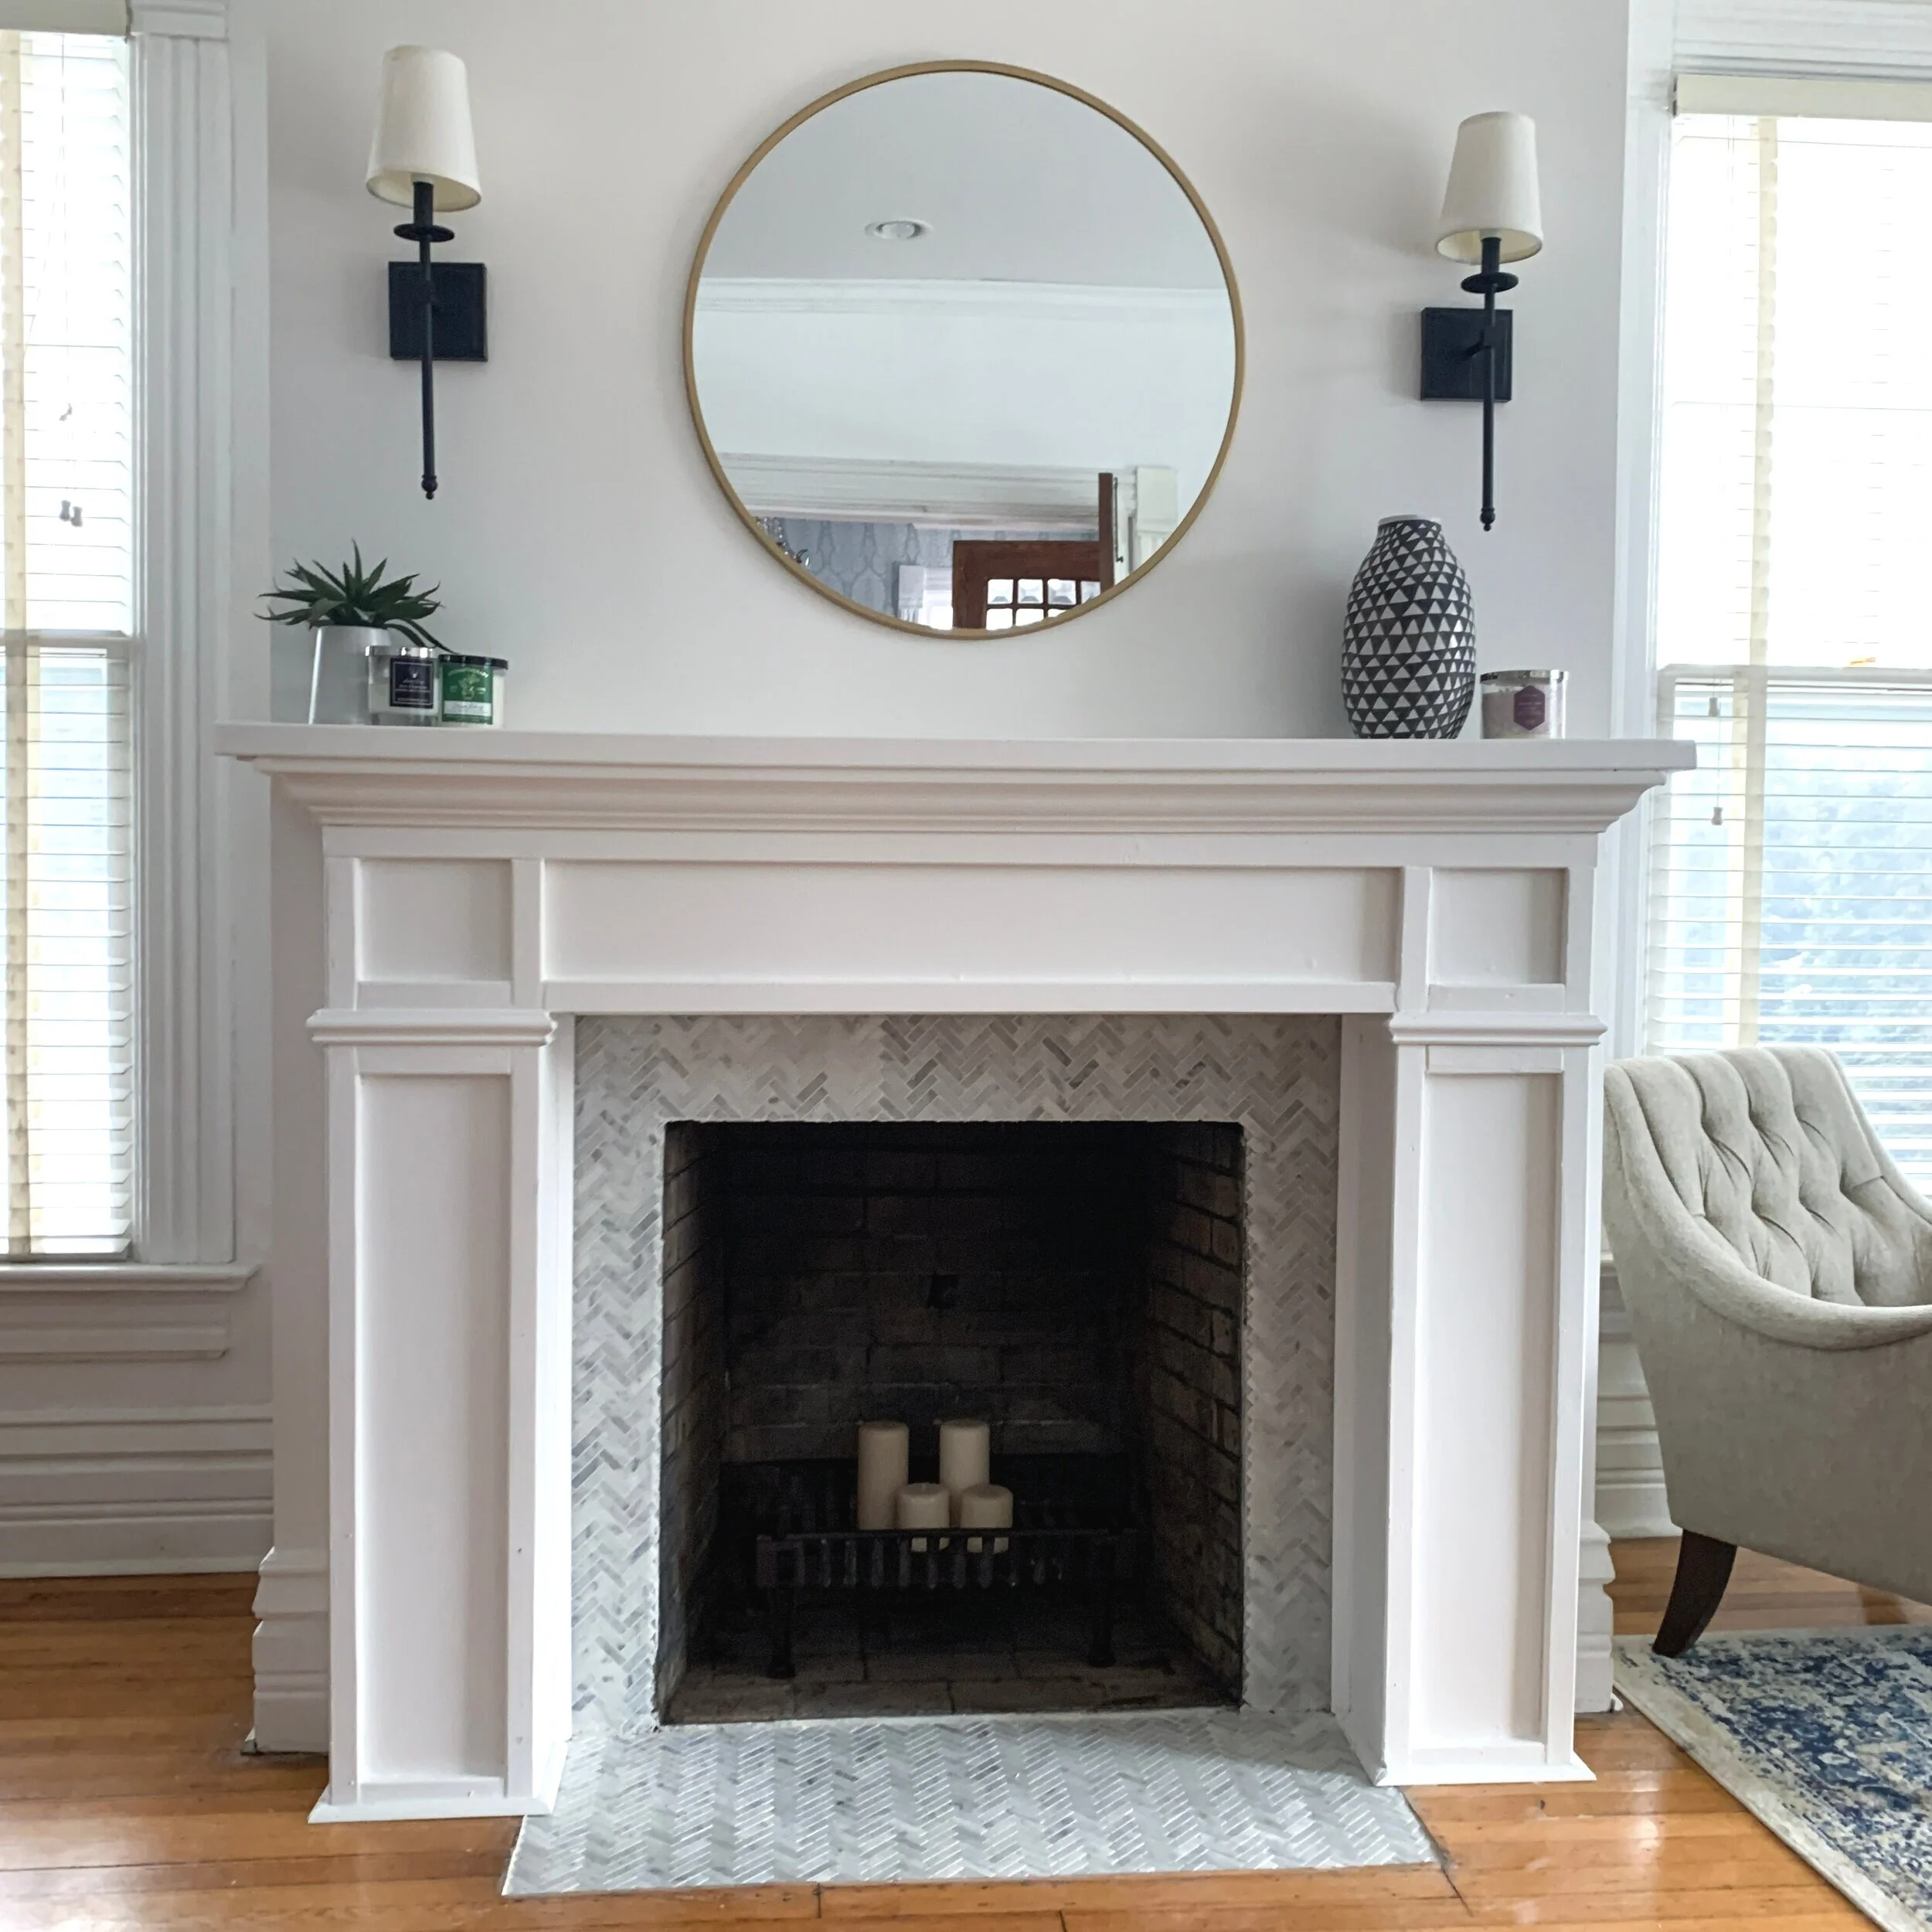
DIY Fireplace Makeover
I can hardly believe we’re approaching two whole years in our house! We’ve come a long way since we moved in. We’ve done a dozen or more projects on this old, 1901 farmhouse, and we’re only just starting to writing them down. Hindsight is 20/20 (Happy New Year, ya’ll).
Our first major project of the new year was a DIY fireplace makeover. If you can believe it, this entire project only cost us about $200. And, with the help of some thoughtfully-gifted Home Depot gift cards (thanks Mom and Dad), we were able to only spend about $150 out of pocket.
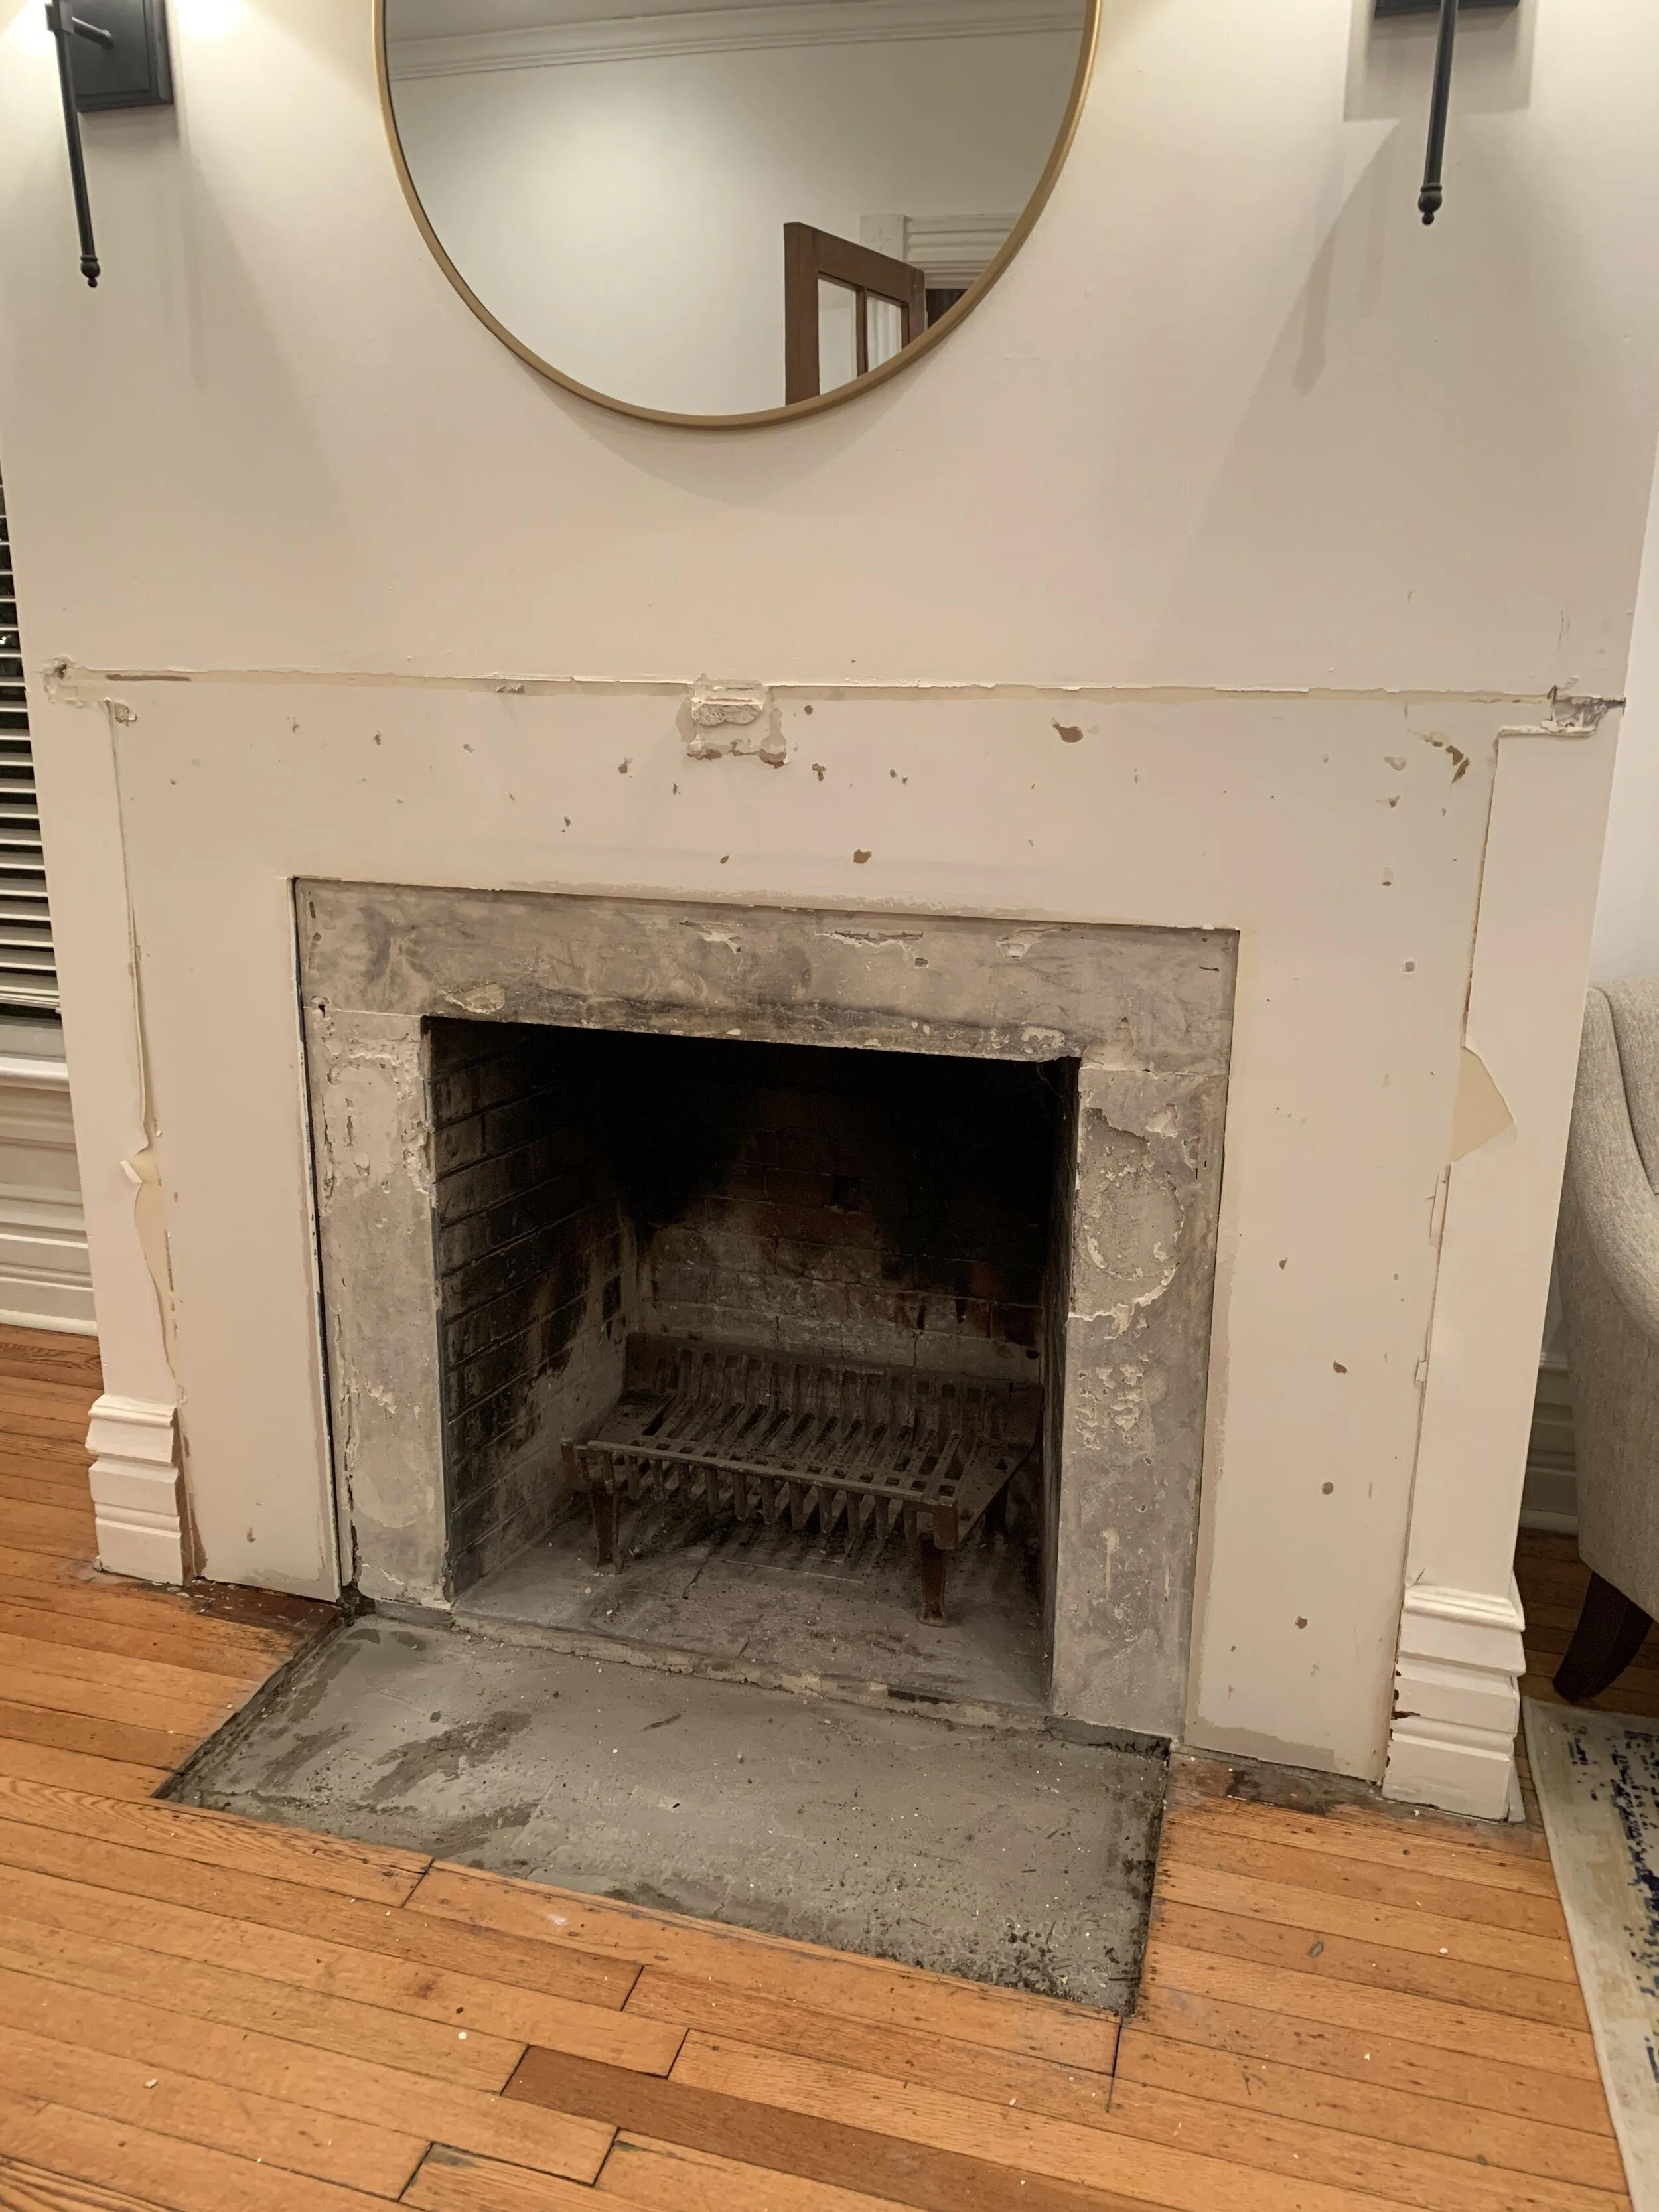
Our fireplace wasn’t a true eyesore to begin with, but there was definitely something lacking.

Boring, right? If we want to throw it all the way back, she looked even more plain when we moved in.

Since we’ve moved in, we’ve changed the mustard-colored walls, added crown moulding, and swapped out the sconces. These small fixes made a big difference! However, this New Year we decided it was finally time for the big fireplace makeover.
I started to browse social media and blogs in December to begin our planning process. I knew I wanted something more interesting, but not too modern. There are quite a few DIY fireplace posts out there, and we found some designs we really liked. Now what we should’ve done is detail a step by step plan, and write down our measurements. However, that’s just not really our style. We like to get a general idea and then just wing it. (Do not recommend if you don’t want to drive back and forth from the hardware store multiple times a day). It’s no coincidence that the acronym for our site is OOP(s).
Once we had our vision, step one was demo.

Tearing down the mantle was pretty simple. We took out a hammer, and we had it in pieces pretty quickly. Most of the mantle was attached with wood glue to the wall, so a crow bar would also work for this task. Next we needed to pull up the granite. This took way more muscle. The granite was really thick, and extremely heavy. We realized we weren’t going to be able to pry it out without damaging our floors. The only solution was to try and smash it up with a hammer. We eventually got one corner to crack, and from there we were able to haul it out in pieces.
We stood back and marveled at our own strength. The proper next step here is to tile, and then build your mantle around the tile. Unfortunately, we were riding that sweet, demolition high and got overly excited at the prospect of building our structure. Off to Home Depot we went.
We chose MDF board for the main structural pieces of the fireplace. MDF board is a fantastic surface for building these types of projects. MDF is much smoother, lighter, and cheaper than particle board. Additionally, it takes paint really well. Home Depot is fantastic because they’ll cut all your wood for you for free.


I told you planning would come in handy. Barrett built the main structural part of our mantle by taking the MDF, cutting it to size, and then attaching them at a right angle using finishing nails and wood glue. We utilized some 1 X 2’s to reinforce the MDF.


His wife probably could’ve helped by holding the MDF in place, but come on, she had get the ‘gram. A well-placed clamp will work in place of a partner.

After we had put together the main structural pieces of the mantle, we decided to move it inside and build around it. We attached the mantle to the wall using wood glue and strategically placed screws.


Now it was time to add the top piece of the mantle. We decided to use a 1x10 for the top piece of the mantle. We framed out the 1x10 on three sides with 1x2 pine strips so that no raw edges were exposed. We also knew that we wanted to add some crown moulding later; the 1x2 pine strips helped to create a more cohesive look and prevented any exposed edges or seams.

The top of the mantle was attached with mostly wood glue, but a nail gun would also be super helpful in a project like this. We’ve utilized a Dewalt nail gun in the past, and it makes these types of jobs so much easier.

Not bad, eh? Once we had the main structural part of the mantle completed, it became mostly decorative from there. We knew we would be adding moulding to the fireplace, so we began to bump out the places we wanted to add our moulding. It’s important that the moulding lay flat against the mantle, so the added 1x2’s bumped it out far enough.


Now it was time to add our moulding. Cutting moulding is tricky. To cut moulding you’ll need a mitre saw. It needs to be cut on 45 degree angle. On the mitre saw you are making 45 degree angle cuts, but it’s not as simple as a regular 45 degree angle. You’ll need to cut the piece of moulding upside down so that it’s a 45 degree edge as well. This enables the moulding to fit together. Don’t make the mistake of thinking you can use a handsaw for this. We tried. We failed. We bought new moulding.
Once you have your cuts made, pop that moulding up! We attached the moulding to the mantle using finishing nails. The moulding rests directly on the piece of 1x2 and should fit snugly under the top of the mantle.

We then started to frame out the decorative elements of the mantle. We decided to go with a simple, boxed design. We used more of the 1x2’s to create the boxes.

Looks pretty good, right? From there we added some additional moulding because the boxes were a little bit too modern for our liking.

We needed our trusty mitre saw again for these smaller pieces of moulding. We only had outside corners to do once more. Once we popped those up, we could really see our design coming to life. We decided to pause here to do our tiling.
As I mentioned, we really should have done our tiling first, but we definitely didn’t want to do it last. For our tile, we decided to do a small, marble herringbone pattern. We probably would’ve chosen cheaper tile if it wasn’t for those awesome gift cards.

The floor plate was actually extremely deep. When we put our tile in, it sat about an inch below the wood floors. The giant granite slab had been thick! We decided to use some old, scrap tile underneath our nice tile to give it a boost. It’s totally safe to tile over concrete or even exiting tile, but do not tile over wood. Although it was tempting to utilize some scrap MDF board to fill in that gap, that would have been a disaster. Wood expands and contracts with heat at a totally different rate than tile. If you attempt to tile over wood, you’ll end up with cracks in your grout and tiles.
We, thankfully, had some existing ceramic tile on hand from a kitchen project a few months ago. We laid our first layer of ceramic tile down just to bump our nice tile up a bit. Tile adhesive takes 24 hours to dry, so we had to wait before we could lay the next layer.

After about a day, it was time to lay the marble tile pieces. I really liked working with this tile because it was sold by the square foot, and didn’t require spacers. We carefully cut the tiles down to fit perfectly in our fireplace. We also knew we’d be adding some trim to cover the edges, so it didn’t need to be totally perfect. We went with bright white grout. One thing to note, marble is pretty soft, so I had to be really careful while scraping off tile adhesive and scrubbing the grout from the tiles.

After we added grout to the all the tiles, Barrett placed a piece of wood against the top portion of the tile to give us a nice grout line. It did ultimately need to be sanded a bit, but it did the trick.

After the grout had dried, we were ready for the finishing touches. We sanded, primed, painted, and added some trim. Finally, Barrett cleaned out the interior the fireplace with baking soda and dish soap. Use 1/2 cup of baking soda and 3 tablespoons of dish soap to create a paste. Wipe down with water.
We also used vegetable oil to polish up our cast iron hearth. You can soak anything cast iron in vegetable oil, allow to dry, and it has new life!
And, she’s done!


